• Skip to primary navigation
  • Skip to main content
  • Skip to primary sidebar
Bill4Time

Bill4Time

Legal Time Billing Software

  • Call Us: 877-245-5484
  • Features
  • Support
  • Sign-In
  • Get Started

Just Announced: Customize IDs

Just Announced: Customize IDs

April 13, 2016 By Kristin O'Neill 3 Comments

Customization is a crucial part of any software and with Bill4Time you can customize the system to fit your needs. Within your Settings, there are system preferences such as establishing common key words and phrases that will be used throughout the software – like your Project, Labor,  Activity, and Tax mnemonic terms. You also have the ability to customize your IDs by selecting these options in your settings. With our latest release, the ability to customize your Invoice Numbers is now available.

customize settings

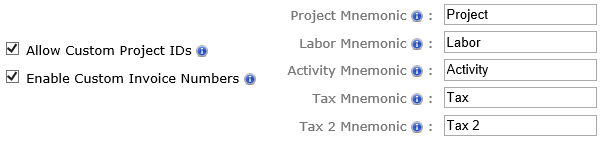
By default you will always have the option to customize your Client ID’s when adding new clients in the system. Under your Settings you can also enable the ability to customize your Project and Invoice numbers as well. Once these fields are checked in your Settings you can go through and change your Project ID’s and Invoice Numbers at any point.

invoice number

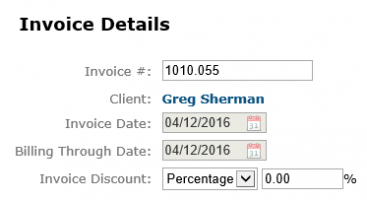
Once you go through Invoicing – Create Invoice to create a new invoice, the bill will be assigned a specific Invoice number. You can then change this to any number (or letter) and click Save to keep that new invoice number set on that specific invoice. With this option you can now set your own custom invoice numbers for each of your invoices.

Filed Under: Blog

Tip of the Week: How To Include Disabled In Reports

April 13, 2016 By Bill4Time Staff Leave a Comment

When you disable a client, close a project, or disable a user, the data is not lost and you can still run reports on the time and billable amounts. For example, when running reports, next to your User filter you will see an “Include Disabled” icon which you can click to enable and that will allow you to run reports on both Active & Disabled users in your account. The same filter option is available for your Clients and Projects as well.

user dis combined
When disabled, the icon will appear gray (left).

When enabled, the icon will appear blue (right).

Filed Under: Blog, Clients, Running Your Business, What's New

Get Paid Faster: Setting Up your Bill4Time Payment Portal

April 11, 2016 By Bill4Time Staff Leave a Comment

The Bill4Time Client Payment Portal is your client’s online gateway to your business. Your clients can view invoices, outstanding balances and payment history.  Businesses that offer clients convenient online payments options get paid up to 30% faster than when using traditional payment methods. That means, instead of sending a paper invoice via snail mail to your client and waiting at least a net 21 or 30 days, then, running to the bank and manually entering the payment into your accounting system, you can simplify your life and the life of  your client in one swoop.

PayPal has been a leading merchant for payment processing for over fifteen years and has paved the way for many other amazing applications, like Stripe. Stripe is simple and you can have an account setup within minutes. This technology partnership enables you to accept credit card payments instantly through the Bill4Time Client Payment Portal. Setting up Stripe for your online payments is intuitive and simple for any size business, and provides your clients with seamless functionality that gets you paid faster. ACH integration will also be available through Stripe in the future allowing your clients more ways to pay.

With your Bill4Time Client Payment Portal, you can send clients a notification that an invoice is ready to be viewed and paid online. The client logs in and can view the invoice, account history and PAY you in one simple process. Imagine getting a notice on your smartphone, reviewing the invoice and clicking PAY NOW without skipping a beat?client-portal-2

Setting up your Client Portal takes minutes, but the benefits last forever. It’s easy:

  1. From your dashboard, access the client portal by going to Settings – Client Portal then click “Manage Client Portal.”
  2. Enter your Bill4Time Username and Password. (Currently only Admins have access to login, but this user type can be changed for other users in their User Permissions.
  3. Once signed in, you can access the Account Settings. Upload your logo. Add Stripe, PayPal and customize the payment settings.
    • Send automatic invoice notifications via email to clients.
    • Allow clients to view their account history.
    • Calculate invoice balances.
    • Customize the level of security.
  4. Next, invite your clients!

We have a short video that will walk you through the process. It’s so easy, you’ll wonder why you didn’t offer online payments sooner. View this video on How to Setup Your Bill4Time Client Portal. And take a peek at our other great videos so you can get the most out of Bill4Time.

Filed Under: Accounting, Blog, Running Your Business, What's New

Just Released – Account Manager!

February 25, 2016 By Kristin O'Neill Leave a Comment

Bill4Time has added new management features! This functionality is designed for Account Managers to manage the data entered for clients they manage.

Within each user you have the ability to toggle on Account Manager functions like “View Entries”, “Edit Entries”, and “View Billable Rates” under User Permissions.

account manager1

Once these functions are turned on, the Account Manager will have the ability to go under Time/Expenses, Projects , and Reports to view the time entered for all users on any client they manage. This will not affect their ability to add time for clients they have access to, but do not manage. So if a user has limited access in the system, these permissions will still stand on clients they do not manage.

On Reports, each user will still be able to run reports for themselves; but now, they will also be able to run the reports for the users that enter time and expenses on clients they manage. In the example below, user “Kristin ONeill” has access to add time to client “Phyllis D’mar”, but she is not the account manager for this client. However, she is the account manger on client “Sally Moore”, so she can view and edit the entries for users Jane Smith, Kevin Moore, and herself, on this report.

account manager2

Filed Under: Blog

Just Released – Late Fee Advancements!

February 15, 2016 By Kristin O'Neill 15 Comments

hourglass-620397_1280

Need a quick way to track overdue fees from past due invoices? With the new Automated Interest feature in Bill4Time, it’s never been easier. You have the ability to turn on or off whether you would like interest to be calculated automatically or if you would like to continue manually applying fees to invoices.

Under Invoice Setup you can check the box next to Auto-Calculate Fees along with entering your Fee Type and Grace Period. Once that is saved, the system will automatically track your interest based on your settings. These settings can also be changed per Client and Project.

Late-Fees1

From the invoice, you can check to see the amount applied. You can also edit the late fee to make any changes or adjustments if you need to override the default settings. Each day an invoice is overdue it will accrue interest.

Late Fees2

Adding a late fee to your invoices gives your clients an incentive to pay their invoices on time. The automated late fee will also give you assurance that valuable time and money is not being lost.

Filed Under: Blog, What's New Tagged With: interest, just released, late fee, system update

Just Released – New Invoice Discount Feature!

February 11, 2016 By Kristin O'Neill Leave a Comment

Within Bill4Time, you are able to include a flat fee or percentage amount discount on your invoices. This feature has recently been enhanced to allow for a default discount setting within the Invoice Presets for each client and matter. Establishing a default discount setting allows you to automatically apply this discount to each invoice for a specific client or matter – eliminating the extra step remembering to add the discount amount after the invoice has been created.

Once you choose your discount option, either Flat Fee or Percentage, you can also default it to only apply to Labor or Expenses.

Once an invoice is created, the settings you established in your Client or Matter will automatically take effect. You can always override this on the Invoice level if you want to change the discount per invoice.


Filed Under: Blog, What's New

  • « Go to Previous Page
  • Go to page 1
  • Interim pages omitted …
  • Go to page 72
  • Go to page 73
  • Go to page 74
  • Go to page 75
  • Go to page 76
  • Interim pages omitted …
  • Go to page 103
  • Go to Next Page »

Primary Sidebar

The best way to manage your practice online.

Topics

Recent Posts

  • What Is Attorney Time and Billing Software?
  • How Much Does Legal Billing Software Cost?
  • What Is the Best Attorney Time and Billing Software?
  • How Do Lawyers and Paralegals Keep Track of Their Time?
  • What Is the Best Time Tracking Software for Lawyers?

Copyright © 2025 · Genesis Sample Updated On Genesis Framework · WordPress · Log in

  • Home
  • Get Started
  • Vulnerability Reporting Policy